
 Deutsch
 English
 Francais
 Español
 Italiano
 Nederlands
 Polski
Microscopy
Discover the world of microscopy with BRESSER microscopes
Microscopes allow you to transcend the limits of human vision and explore the fascinating world of the microcosm. These optical instruments have become an indispensable tool in many fields of work – from biology lessons about parasitology to quality control in industry, microscopy is used in a diverse range of applications. It also makes a great hobby – equipped with a microscope, you can collect your own specimens and examine them in closer detail.
BRESSER offers a wide range of models for different applications and needs, including entry-level and advanced models for amateur microscopists, and professional microscopes for use in science, research and industry. If you’re new to the world of microscopy, we’ve put together this guide to explain all the factors you need to consider when choosing a new microscope.
How is an optical microscope constructed?
The most common type of microscope is an optical microscope, which uses refraction to produce heavily magnified images of small objects. Whilst the specifications of different optical microscopes may differ, the basic design is always the same.
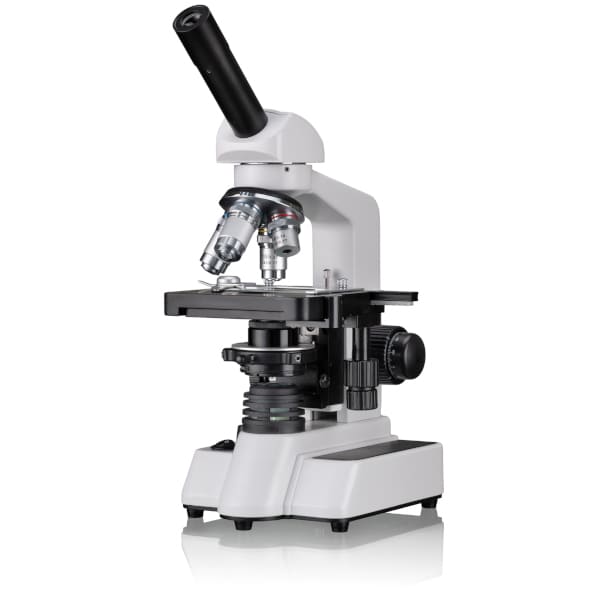
EYEPIECE
The eyepiece is a system of lenses at the top of the microscope.
SPECIMEN STAGE
The specimen stage is typically located underneath the revolving nosepiece, and is used to hold the specimen.
LIGHT SOURCE
There are two types of light source used in microscopy – reflected light and transmitted light.
OBJECTIVE LENS
In addition to the eyepiece, the objective lens is the second most important optical component on a microscope.
CONDENSER
The condenser is a system of lenses that prepares the beam of light for the objective and the corresponding numerical aperture.
STAND
The stand is used to secure the individual components of the microscope.
The eyepiece is a system of lenses at the top of the microscope, and enables the user to look into the optics. It is designed to further magnify the intermediate image from the objective lens. In most cases, the eyepiece can be exchanged to change the magnification level.
The properties of the eyepiece vary between microscopes. For example, on a monocular microscope – the classic type of microscope – there is only one eyepiece. These models are generally recommended for occasional use and beginners.
For professional users, on the other hand, comfort is a key factor. For this reason, many models have two eyepieces – so-called binocular microscopes. These models are ideal for longer observation sessions, as you can look through the optics with two eyes. In addition, there are also trinocular microscopes with three eyepieces – two for your eyes, and one for connecting a camera so that you can capture images of your observations.
There are two types of light source used in microscopy – reflected light and transmitted light. Transmitted light microscopes are used for examining transparent specimens. Traditionally, natural daylight or artificial light is directed through the specimen from below via a mirror. However, most microscopes now come with their own light source, which can often be adjusted to meet different needs. High-end models use so-called Köhler illumination, which reduces scattered light and illuminates the specimen uniformly by optimising the optical train. This enables the microscope to deliver a consistently optical resolution, contrast and depth of field.
On a reflected light microscope, the light source is located next to the specimen stage and shines onto the specimen from above. This type of microscope is typically used for opaque objects such as coins, circuit boards and rock samples. In addition, some models feature both illumination methods. For very high magnifications on special microscopes for metallurgy or material testing, the light is shined onto the specimen through the objectives.
The condenser is a system of lenses that prepares the beam of light for the objective and the corresponding numerical aperture. This ensures that images are rendered with an optimal resolution and crystal-clear details. The aperture is designed to adjust the beam of light to the objective and must be opened further at high magnifications. You can also use filters to optimise the illumination to your individual needs. In microscopy, there are numerous highly specialised techniques for illumination such as phase contrast, dark-field and differential interference contrast microscopy. However, these require additional optical components.
In addition to the eyepiece, the objective lens is the second most important optical component on a microscope. In a nutshell, both lens systems are connected to each other via a tube. A microscope usually contains multiple objective lenses which are mounted on a revolving nosepiece. By rotating the nosepiece, you can change the lens to obtain a different magnification level.
There are two numbers that are relevant for objective lenses – the magnification and the numerical aperture. The magnification level is typically between 4x and 100x. You can calculate the total magnification of a specimen that you are viewing through the microscope by multiplying the objective magnification by the eyepiece magnification. For example: 20x objective und 10x eyepiece = 20 x 10 = 200x magnification.
The numerical aperture (similar to the aperture on a camera) determines the resolving power of the objective lens. The larger the aperture, the higher the resolution and therefore the lower the depth of field and working distance. Models with a high numerical aperture also come with a higher price tag. For optical reasons, only immersion objectives which require a drop of oil between the front lens and the specimen can reach numerical apertures of more than 1.0. Without this drop of oil, a large part of the light would be reflected on the front lens of the objective instead of passing through the optics.
The specimen stage is typically located underneath the revolving nosepiece, and is used to hold the specimen. On transmitted light microscopes, the specimens are mounted on small squares of glass called slides. In order to ensure that these do not slide out of place, most specimen stages feature specimen clamps to secure the slides in place. Well-equipped microscopes come with an XY stage that can be used to precisely reposition the specimen with minimal movement. This is particularly useful at high magnifications.
The stand is used to secure the individual components of the microscope. It must be sturdy and have a heavy base to ensure that your optical instrument remains stable. The stand also features control elements, e.g. controls for the condenser setting or the focusing wheels for fine and coarse focusing
.
Special microscope types
Some types of microscope have special features. The following table lists the features of 4 different models:
| Key features | Key advantages | Applications | |
|---|---|---|---|
| Stereo microscope | Two separate optical paths using two separate objectives and eyepieces, reflected light | Three-dimensional, vivid image | Biology, horticulture, surface analysis, close-range applications, industrial applications (e.g. quality control) |
| Stereo zoom microscope | Stereo microscope zoom objectives, reflected light | Three-dimensional, vivid image, stepless zooming | Biology, horticulture, industrial applications such as assembly and repairs, biology, measurements and testing |
| Digital microscope | Capture images from the built-in camera and view them on a computer or the built-in screen, often retrofittable, supports all types of microscopes | Easier to document and analyse your findings, several people can examine the specimen simultaneously | Biological and medical microscopy, teaching |
| Inverted microscope | Observe specimens through the base of the sample holder | Significantly more space for examining directly in the culture vessel without removing a sample, or for examining large volumes | Research, veterinary medicine, agriculture, marine biology, limnology, aquaculture |
Special contrasting techniques
The most common form of microscopy is bright-field microscopy, which typically involves illuminating a transparent sample with transmitted light. However, with some objects, the contrast with the bright background is too low, and other techniques must be used. The following section provides an overview of these alternative techniques.
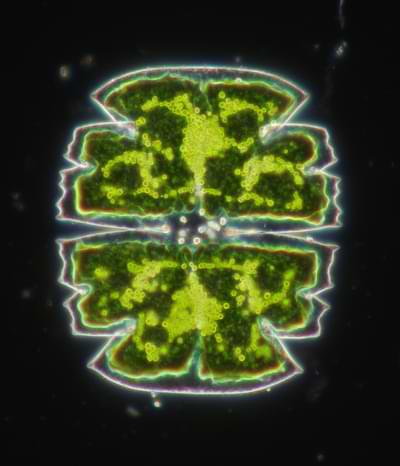
This technique involves using a special condenser, which ensures that only light which is scattered by the specimen reaches the objective. This renders a bright image of the object on a dark background. Dark-field condensers have either a central aperture that blocks direct light or a complex optical construction of lenses and mirrored elements. Dark-field microscopy is typically used to observe transparent cells or microorganisms with a low contrast. It is also well suited to living cultures of aquatic organisms or algae, as the objects do not need to be dyed and can therefore be observed in motion.
The phase contrast technique requires a combination of a special condenser with exchangeable apertures that produce a ring of light, and corresponding phase contrast objectives with a phase ring. The light that radiates through the specimen undergoes a phase shift on components with different refractive indices. Light that is not diffracted is blocked at the phase ring. This method can be used to examine colourless objects. Green light provides the perfect conditions for phase contrast, therefore it can be helpful to use a green filter.

Polarization microscopy is ideal for examining optically active or birefringent specimen structures. Typical applications include geology and mineralogy, although it is also suitable for examining materials in industrial applications. If the layer thickness of the sample is known, the resulting interference colours can be used to determine the type of material. This technique can also be used to view interesting structures of living organisms, such as the muscle fibres of daphnia and rotifers. Find our more about contrasting techniques for microscopy in our detailed guide: View guide

How to choose a microscope – the most important factors to consider before your purchase
Application
As is often the case with specialist gear, the first question you should ask yourself is the purpose for which you will use the microscope. Given the diverse range of possible applications, there are many answers to this question. In the BRESSER shop, you can filter according to the following applications in order to find products that meet your needs:
- Entomology
- Mineralogy
- Biology
- Botany
- Material testing
- Metallurgy
- Teaching
- Postage stamps
- Coins
- Research
- Parasitology
- Laboratory work
Magnification
Magnification requirements vary significantly depending on the application. For example, a workshop microscope for repairing watches or electronic parts will need a much lower magnification than a microscope for examining parasites. The magnification level, which depends on the supplied objectives and eyepieces, is therefore a decisive factor.
If you would like to vary the magnification with additional objectives and eyepieces, you should ensure that the eyepiece and objective are compatible. The maximum useful magnification for a specific objective can be calculated using the following simple formula:
Numerical aperture of the objective x 1000 = maximum useful magnification
Example: The maximum magnification of a 10x objective with a numerical aperture of 0.25 is 250x, when a 25x eyepiece is used. Increasing the magnification to above the maximum useful magnification will not reveal any additional details (so-called ‘empty magnification’) and is not recommended.
Eyepiece
If you spend a lot of time with your microscope, comfort is an important factor to consider. For optimal comfort, choose a model with a binocular eyepiece, or use a digital microscope or MicroCam for onscreen analysis. A monocular eyepiece is sufficient for occasional use and entry-level microscopy. If you would like to capture images of your discoveries with a camera, opt for a trinocular instrument.
Target group
As you’d expect, a beginner will need a different type of microscope to a professional user. In the BRESSER shop, you can also filter according to the type of user (beginner, advanced, expert, professional user, and research and science). The following section contains a few recommendations from our in-house specialists:
Entry-level microscopy sets
Featuring a microscope and a diverse range of accessories, our entry-level microscopy sets contain everything you need to get started. The BRESSER microscope sets are primarily intended for school-age children and amateur biologists.
Student microscopes
The BRESSER research microscopes are designed for students and ambitious school pupils. They can be equipped with a camera so that you can analyse images and videos directly on your computer screen.
Professional laboratory microscopes
The professional microscopes from the BRESSER Science series allow you to view structures that cannot be seen using traditional bright-field microscopy. These models are typically used in research institutes and by professional users in industry.
Children’s microscopes
The BRESSER JUNIOR microscopes make a perfect gift for budding young researchers. To find out more, read our guide:
Choosing the right microscope for children.
Specimen stage
It’s also important to consider the specifications of the specimen stage. If you need to work at high magnifications, an XY stage will help you to place your specimen in an optimal position. For observing opaque objects (e.g. in metallurgy or material testing), a large stage can make your work easier. In the case of workshop microscopes where you need to work under the lens, the working distance is a decisive factor.
Accessories
The accessories that come with your microscope are also an important point to consider. Microscopy sets are ideal for entry-level users, and come with everything that you need to get started, including pre-prepared permanent specimens, a tool kit, empty slides and cover slips. Some BRESSER microscopy sets also come with a smartphone holder or a microscopy camera so that you can capture your discoveries and share them with others.
Mikroskop FAQ
There are all sorts of microscopy projects suitable for children. To get started, click here for a few suggestions from our in-house microscopy team.
Zellen können je nach Herkunft ganz unterschiedlich groß sein. Besonders einfach erkennbar sind Pflanzenzellen wie z. B. die der Zwiebelhaut. In Wurzelspitzen teilen sich Zellen besonders oft, hier sind dann sogar die Mitosestadien, d. h. die Chromosomen sichtbar. Manche Wimperntierchen im Tümpel können sogar mehrere Millimeter groß sein und sind damit viel größer als manche mehrzelligen Rädertierchen. Man kann sie sogar schon unter einem einfachen Stereomikroskop bei 20-facher Vergrößerung sehen.
In order to see bacteria, you will need a magnification of at least 400x. In addition, the resolving power must also be high enough. This means that you will need a microscope with a condenser, and ideally Köhler illumination. The visibility of bacteria, which only measure several micrometres, can be significantly improved with a stained preparation, or by using a contrasting technique such as phase contrast.
