
 Deutsch
 English
 Francais
 Español
 Italiano
 Nederlands
 Polski
In principle there are two optical concepts with astronomical telescopes: the reflector telescope and the refractor telescope (lens telescope)
Telescopes
4. Telescopes
4.1 The telescope as observation instrument
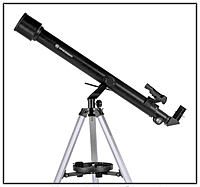
Fig. 58: Lens telescope for beginners, type Fraunhofer Achromat
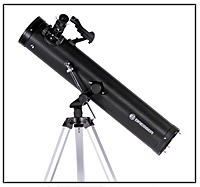
Fig. 59: Newtonian reflector telescope for beginner
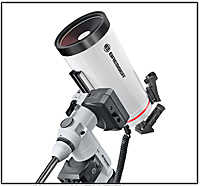
Fig. 60: Advanced reflector telescope, Maksutov-Cassegrain design
In order to get an idea of how it is used to observe the sky, it is necessary to dedicate a few sentences to the tasks of a telescope. If one believes the advertisements, the telescope is a magnifying glass, which shows the sky up to a magnification of 600 times or more and spoils us with multicoloured gas nebulas. During practical observations we will very soon realise that this is not the case. On the contrary, magnification is important, but not the crucial factor for the efficiency of your instrument. The ability to collect light (light intensity) and the image contrast of the optics are important features, which distinguish good telescopes. There are several designs of telescopes, all of which have their pro’s and con’s. Unfortunately there is no “Jack of all trades”, which satisfies all needs.
We will begin briefly running over the designs of telescopes. We will divide them simply into lens telescopes and reflector telescopes.
Refractors (lens telescopes) mainly consist of an objective, consisting mainly of two lenses, which are only separated by an air gap (achromatic lenses). The objective collects the incoming light and bundles it into the focal point. An eyepiece at the focal point magnifies the image. The distance between the objective and focal point is called the focal length.
With reflectors ( reflecting telescopes) the task of the objective is taken over by a concave reflector curved inwards (parabolic). The reflector is in the rear part of the telescope tube. Similarly, it collects the incoming light and bundles it into the focal point. Between the focal point, where again the eyepiece is located, and the main reflector, is a catch mirror (secondary reflector), which returns the bundled light to the eyepiece. T h e re are essentially two designs of reflector systems. With the Newton reflector telescope, light is laterally deflected through 45°. The eyepiece is in the upper area of the tube and usually one looks sideways into the telescope.
With Cassegrain telescopes the main reflector is centrally perforated. The catch mirror is also centrally installed in the path of the rays opposite the main reflector at the front end of the tube and reflects the image back through the perforation in the main reflector to the tube towards the eyepiece. The eyepiece is, as with the lens telescope, situated at the rear end of the tube.
Both designs have their advantages and weaknesses. The decision topurchase a telescope must be made by the astronomer, depending upon the operational area and the size of your budget.
Refractors a re superior in terms of the quality of the image than the reflecting systems of the same size. They are do not easily go out of adjustment and therefore require very little maintenance. These characteristics make the lens telescope the ideal instrument for a beginner.
4.2 Optics
4.2.1 Refractor (lens telescope)
A lens telescope consists of an objective lens and an eyepiece. It is important that the objective lens is achromatic (double lens with air gap). The diameter of the objective lens is along also decisive in determining the light intensity of the telescope. Advantages of a lens telescope over a reflector telescope are set out below.
a) no light loss caused by the shadow of the catch mirror (obstruction) as with reflectors
b) outstanding image definition
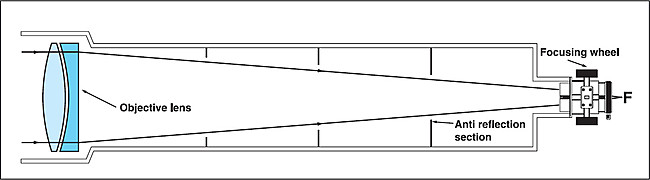
Fig. 61: The optical construction of a lens telescope contains an optical design in which the light comes from the left through a pair of objectives and is focussed at the focal point (F)
4.2.2 Reflector (reflecting telescope)
The most common design of reflector telescopes is named after its inventor, Sir lsaac Newton ( 1643 to 1727). Newton reflectors possess one spherical – or with better designs parabolic – polished, concave reflector, whose surface is coated with aluminium. The rays of light are deflected through 90°, after being reflected by the main reflector, shortly before the focal point, by means of a plain, 45° inclined catch mirror. The focal point therefore lies outside the main tube in which the eyepiece is located.
Which is better – the lens telescope or the reflector telescope?
It is very difficult to give an answer for amateur purposes. As a general the rule of thumb, a reflector telescope with a particular aperture is of slightly lower quality in terms of image and image resolution than a lens telescope with the same aperture.
↑ Back to top
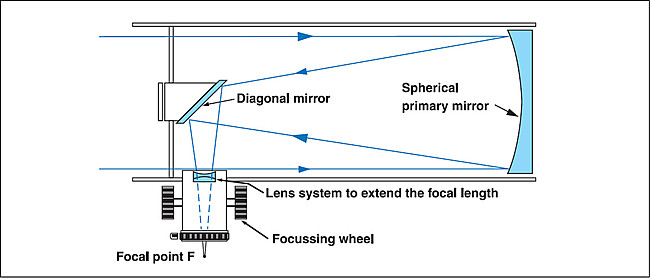
Fig. 62: The optical design of a Newton reflecting telescope containing a focal length extension, achromatic lens system, that enables the combination of longer focal length and a shorter telescope tube.
4.3 Mechanics
In a telescope a whole number of quite diverse mechanical construction groups are built together, which do not differ in their methods of construction and function, but also in their operation. We have already mentioned that a sturdy stand and a solid mount are essential for a satisfactory observation of the sky. There are different basic types of mount, which are described in more detail in the following.
4.3.1 Azimuth mount
With the azimuth mount the telescope body, also known as the optical tube, is hung in a fork and the tube can be moved horizontally and vertically by the user. The azimuth mount is recommended for the astronomical beginner, because objects in the sky can quickly be found with ease.
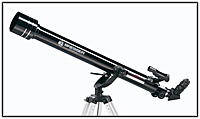
Fig. 63: An azimuth mounted telescope.
4.3.2 Parallax or equatorial mount
More complex telescopes are usually fitted with an equatorial mount. Adjusting is made by two swivelling axes positioned perpendicular to each other (declination and right ascension axis). Equatorial mounting is carried out with one axis, the right ascension axis being pointed at the Pole star and clamped. Orientated in this way, the mounting with the tube installed can only be adjusted only in one axis, just the right ascension axis and thus compensates for the rotation of the Earth. Thus the object in the eyepiece always remains in the centre of the visual field. A tracking motor adjusts the rotation of the Earth around its polar axis exactly in the opposite direction. There are many different models of these engines available from specialist dealers.
The adjustment of the mount (the right ascension axis), the telescope tube on the polar star and the further handling of the mount requires knowledge of the coordinates in the sky, together with practical experience in astronomy. For astronomical photography an equatorial mount is absolutely necessary.
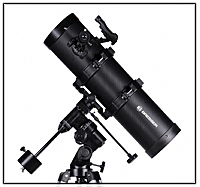
Fig. 64: A parallax mounted telescope.
4.3.3 Tracking motors
If the telescope is fitted with an equatorial mount, then often electrical tracking motors can be attached.
A tracking motor is recommended for the right ascension axis, thus enabling synchronous adjustment of the apparent star movement in the sky to take place.
A tracking motor for the declination axis makes observation very comfortable – but is not absolutely necessary. The declination gives the height of a star in degrees of arc above the celestial equator.
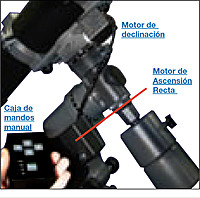
Fig 65: A parallax mounted telescope with tracking motors
4.4 Accessories
For the variety of telescope types, there is just as large a variety at optional accessories. For the beginner the question soon arises, for example, which accessories are important, which are useful or which are completely useless? Always be clear of the type of telescope you possess, which observations would you like to carry out and whether you would like to depart from visual observation and take the first steps towards astrophotography.
4.4.1 Eyepieces
The task of a telescope eyepiece is to magnify the image, which is produced by the main optics of the telescope. Each eyepiece possesses a certain focal length, which is expressed in millimetres (mm). The shorter this focal length is the higher the magnification. An eyepiece with a focal length of 9mm, for example, gives higher magnification than an eyepiece with a focal length of 26mm.
↑ Back to top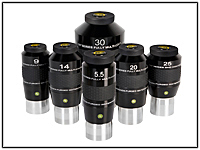
Fig 66: There is the right accessory for every purpose to be found within the range of accessories from the various manufacturers
4.4.2 Important tips on selecting the eyepiece
The quality of an eyepiece is determined, irrespective of its focal length, by its apparent visual field, the manner of viewing and the suitability for fast aperture speeds (large aperture/short focal length).
The apparent and absolute visual field
The apparent visual field can be described as the angle, below which one can see the image produced by the telescope. As an example if we take an eyepiece with a visual field of 10°, this value of 10° is only a fraction of the image field, which the eye can see. The image appears as though it is viewed through a long tube. With a visual field of 70° we are approaching the angle, which our own eyes can see. A view of such will resemble a clear view through a window, with only slight curvature around the edges. Eyepieces with low magnification offer a large visual field, brighter and high-contrast images and strain the eyes relatively little, even with long observation sessions. In order to lay-on an object with the telescope, it is advisable, to begin with a low magnification eyepiece – like for example the super Plössl 26mm. Once you have laid on to the d e s i red object and have it in the centre of the visual field, you can soon change to higher magnification eyepiece. Thus you can enlarge the image as far as the prevailing observing conditions allow.
This visual field is calculated (approximately) by the apparent visual field of the eyepiece (e.g. 60°) and the current magnification of the telescope with this eyepiece. Example: visual field 60°, enlargement 100x, thus 60/100 = 0.6. That means, the actual visual field amounts to 0.6°. Socalled wide-angle eyepieces therefore offer, when the magnification is the same (if the focal length is identical), a larger visual field and also a more comfortable view.
The view behaviour
The viewing behaviour of an eyepiece is of the greatest practical importance for observation. The more easily and more uncramped one can see the object, the more frequently the eyepiece will be used. During the day you can very quickly find the visual field of an eyepiece, it stands out as a bright disk in the eyepiece. At night the situation becomes more difficult. The image of the object is dark, the eyecup of the eyepiece is black and all around is also dark . If the view behaviour is not the best, then once it has been found the eye must be kept exactly behind the eyepiece, otherwise the image will disappear again. This leads to a cramped attitude, which makes observing uncomfortable.
The minimum magnification:
A telescope collects light and passes it on to the eyepiece, which passes it on and concentrates it at the focal point. The eyepiece therefore supplies light bundles to the eye, the so-called exit pupil (EP). This exit bundle may not become infinitely large. If the exit pupil becomes larger than the pupil of the eye, then light is lost.
The size of the exit pupil can be calculated thus:
Exit pupil = Eyepiece focal length in mm x Aperture ratio
Example: The brightness of a celestial object in the eyepiece does not depend on the magnification, the focal length or the aperture of the telescope, but exclusively on the diameter of the exit pupil. Its diameter (the larger, the brighter) is calculated as follows:
Focal length eyepiece : Aperture ratio telescope
Example: Telescope with f/10, eyepiece with 40mm focal length.
40 : 10 = 4 mm exit pupil
Note:
The exit pupil of an eyepiece should not be larger than 7mm as the human eye cannot take more. This would cause light loss (loss of image data).
The maximum sensible exit pupil therefore lies at approx. 6mm and the minimum at 0.5-1mm. If the EP becomes smaller, errors occur in the glass bodies and the tears can be formed in the eyes.
The magnification correctly calculated:
The magnification of a telescope results from the focal length of the telescope and the focal length of the eyepiece in use. To calculate the magnification of the appropriate eyepiece you divide the focal length of the telescope by the eyepiece focal length. Let us take a 26mm eyepiece as an example. The focal length of our telescope amounts to 2000mm. Now we calculate as follows:
Eyepiece magnification = Telescope focal length / Eyepiece focal length = 2000mm / 26mm = 77x
The enlargement with this eyepiece amounts therefore to approximate x77
View through a Plössl eyepiece
Plössl eyepieces are very popular owing to their high image definition and good contrast. They are mostly used as a beginner’s telescope for normal observations lasting 1-2 hours. They have very good image definition and acceptable view behaviour. In the picture on the left you can see an example of how large the visual field is.
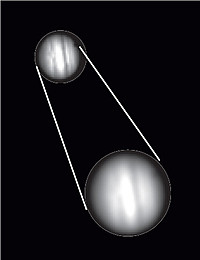
Fig 67: The planet Jupiter with the correct, sharp magnification, above and with the incorrect blurred magnification
Can one ever select too high magnification?
Yes, one can! The most frequent error, which is committed by beginners is to over magnify the telescope. A very high magnification is selected, which the construction of the telescope, the weather conditions or the light conditions cannot provide. Therefore please always keep in mind that a really sharp, but less magnified image is much more beautiful, than a highly magnified, but completely blurred image and it will not give you much pleasure (fig. 67). Magnification over 200x should be chosen only with absolutely calm and clear air.
Most observers have three or four additional eyepieces handy, in order to use the telescope over the entire range of possible magnifications.
Rule of thumb for max. useful magnification: Objective diam. (mm) x 2
Note:
The viewing conditions vary very significantly from night to night and depend quite considerably on the observation place. Air turbulence arises during very clear nights and distorts the images of the objects. If an object appears blurred and badly defined, then try an eyepiece with smaller magnification. This way you will achieve a sharper and better defined picture.
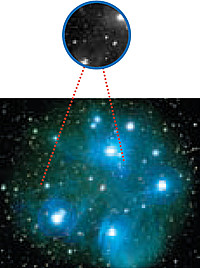
Fig. 68: The open star cluster of the Pleiades. Above the section provided by the eyepiece, below the original.
4.4.3 Filters
Colour filters are a popular aid during the observation of the moon and planets. They increase the contrast of certain details, which are seen poorly or not at all without filters. In principle there are two problems with observation: (a) Blooming, whereby the border between two areas of an observed object are of different brightness and fray or simply blurr, because the eye is overtaxed by the contrast with high levels of brightness; (b) adjacent areas have similar colouring, but only small differences in intensity. Both effects result in the fact that the combination of eye and brain can no longer separate the two details and consequently try to present both objects as one, which is naturally unwanted.
↑ Back to top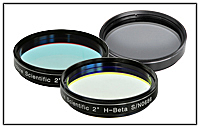
Fig 69: With observations of the moon and the planets different filters are fitted.
In both cases colour filters help. In the first case filters help by reducing the brightness of the quantity of light reaching the eye and the object can then be seen better. In the second case, by using filters of a certain colour which strengthens some of the detail and at the same time weakens the rest, so that the contrast between both details increases and the detail can be recognised. The use of the correct colour filter determines whether a point of detail can be seen or not; whether for example you can see three or five eddies in Jupiter’s atmosphäre. Dependant on the atmospheric conditions both on earth and on the planet which you observe, filters can make an enormous difference!
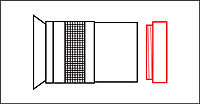
Fig. 70: All filters have an eyepiece thread and are simply screwed into the lower end of the eyepiece.
4.4.4 Photographic accessories
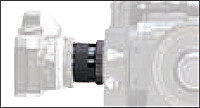
Fig. 71: A SLR-camera is connected to the telescope’s photo connection by means of the photo adapter
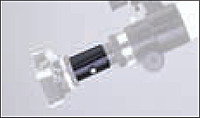
Fig. 72: An analogue SLR- camera is connected to the eyepiece aperture by means of projection and focal adapter
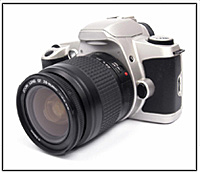
Fig. 73: A digital SLR-camera.
A telescope cannot only be used for observing landscapes and the sky. Depending upon the model and equipment it can be transformed also into a tele objective for your reflex camera. With this arrangement you can record your visual images photographically. There is a wide range of useful accessories for the different telescope types, which you can attach to your telescope and transform it into a high performance telephoto camera.
In astrophotography above everything two things are important:
a) extremely precise focusing
b) precise and vibration-free adjustment
Adapters for connecting mirror reflex cameras to the telescope, are available for most telescopes series . Here the camera without the objective, is attached to the so- called primary focus of the telescope. In this way the telescope works as the telephoto objective.
With the DS series it must be noted that, with the altazimuth mounts, no exposure times of longer than approx. 1 minute are possible, otherwise a noticeable image field rotation arises. For short exposures of planets this azimuth mount is still quite suitable. This can be avoided by a polar adaptation using the polar altitude cradle.
If available, the advance mirror locking solution should be activated, in order to avoid vibration of the telescope when operating the release.
For the exposure itself: with bright and large objects like such as the moon, the exposure mechanism of the camera can be used. With deep sky objects such as galaxies, nebulae etc. the light values are far too small; here one must expose for several minutes with a sensitivity starting at 400 ASP. Digital cameras are of advantage here, they are substantially more sensitive compared to miniature film cameras. In addition, the sharpness can be assessed and adjusted better due to the built-in display.
Important:
Since even minimum adjustments during the exposure ruin the photo (the stars appear as twisted lines), it is important to stress that the telescope should be set up as precisely as possible. With parallax mounting ( model with pole altitude cradle) the arrangements need to be checked several times and corrected if necessary, before taking the photograph.
Photo adapter for mirror reflex camerass: You simply screw and fasten this adapter to the rear end of the parallax mounting and attach the camera-specific T2-Ring (optionally available).
4.4.5 Other accessories
2x Barlow lens (11/4"): This Barlow lens doubles the performance of each eyepiece whilst maintaining good correction of the image field. A 9mm eyepiece results in a magnification of 78x in a lens telescope with 700mm focal length; together with the Barlow lens it delivers the same as the 156x eyepiece.
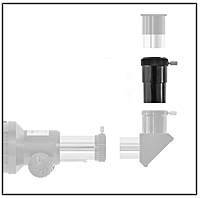
Fig. 74: Barlow lens
45° or 90° Amici prism: The zenith mirror of a lens telescope sets up the orientation of the image, however it leaves it inverse. For terrestrial applications it is desirable to have a completely, correctly orientated picture. This is reached with the Amici prism, which offers a comfortable 45°/90°-sighting and is fitted into the telescope just like a normal 11/4" zenith prism into the 11/4" eyepiece holder.
↑ Back to top
Fig 75: Amici prism
