
 Deutsch
 English
 Francais
 Español
 Italiano
 Nederlands
 Polski
Experiments for the Beginning
You recently bought a Bresser Microscope?
On this page you can find some example experiments to get to know your microscope.
WARNING!!
• • Keep chemicals and corrosive liquids away from children!
• • Do not drink any chemicals!
• Wash your hands thoroughly under running water after use.
1. Introduction
I would now like to give you a few tips to give you a better insight into the wonderful world of microorganisms and crystals. I will explain to you how to prepare objects, for example, so that you can look at them with a microscope. The many described experiments should make you curious to continue observing with a microscope.

1.1 What Kind of Objects?
With a magnifying glass, you can look at non-transparent (i.e. opaque) objects, for example, small animals, parts of plants, tissues, etc. Here, the light falls onto the object and is refl ected back through the magnifying lens and into your eye.
With your microscope, however, you can observe transparent objects, in which the light from the mirror or the lamp goes through the opening on the stage and the so-called prepared specimen. Then, it passes through the objective, the body of the microscope and through the eyepiece into the eye. In this way, the microscope is only meant for observing transparent objects. Many microorganisms in water, parts of plants and the tiniest animal parts are naturally transparent. For other things, we must make them transparent. We may make them transparent through a treatment or penetration with the right materials (media), or by taking the thinnest slices from them (using our hand or a specimen slicer), and then examine them. You’ll now fi nd out how this is done.
1.2 How to Produce Thin Specimen Slices
WARNING: Only do this with an adult’s supervision! Ask your parents to help you!
As I already mentioned, you need to get the thinnest slices possible from an object so that they are transparent and can be looked at under the microscope. First, you’ll need a simple candle. Place the wax from the candle in an old pot and heat in on the stovetop until it becomes liquid. Now, use tweezers to dip the object in the liquid wax a few times.
Attention: The wax is very hot! Be careful.
After each dip, allow the wax to harden and then dip the object into the wax again. When the wax around the object has hardened completely, you can use the specimen slicer to cut thin slices from it. These slices are to be laid on a slide and covered with a cover sl
1.3 The Production of Specimens
The are two basic types of specimens. Permanent specimens and short-term specimens.
1.3.1 Short-term Specimens
Short-term specimens are produced from objects that you want to look at, but don’t want to keep in your specimen collection. These specimens are only meant to be observed for a short period of time, after which they are disposed of. For short-term specimens, place the object on the a slide and place a cover slip on top of it. After looking at the object, clean the slide and cover slip. One of the secrets of successful observation of the microscope is the use of clean slides and cover slips. Spots or stains would only disturb you when looking at an object.
1.3.2 Permanent Prepared Specimens
Permanent prepared specimens are produced from objects turn out well, and that you would like to look at again and again. The preparation of dry objects (pollen, the wings of a fly, etc.) can only be done with special glue. You’ll fi nd such a glue in your accessory set, identifi ed as “gum media.” Objects that contain liquid must fi rst have the liquid taken out of them.
1.4 How to Prepare a Dry Object
First, place the object in the middle of clean slide and cover it with a drop of glue (gum media). The, place a cover glass on the object that is covered in the chemical. Lightly press the cover slip, so that the glue spreads to the edges. Now, you have to let the specimen harden for 2-3 days. Only then is the specimen fi rmly glued and you will be able to use it.
1.5 Smear Specimen
For a smear specimen, a drop of the liquid to be observed (e.g. water from a puddle in the forest) is placed on the end of the slide using a pipette. Then you can smear the liquid across the slide with the help of a second slide. Before observing, let the substance dry together for a few minutes.
2. Experiments
Objects:
1. a small piece of paper from a newspaper with a black and white picture and some text
2. a similar piece of paper from a magazine.
What to do:
In order to observe the letters and the pictures, produce a short-term slide from each object. Now, set your microscope to the lowest magnification and use the specimen with the newspaper.
Result:
The letters on the newspaper look frayed and broken, since they are printed on raw, low-quality paper. The letters on the magazine look smoother and more complete. The pictures in the newspaper are made up of many tiny dots, which appear slightly smudgy. The pixels (halftone dots) of the magazine picture are clearly defined.
Objects:
1. a small piece of color printed newspaper
2. a similar piece of paper from a magazine
What to do:
Make short-term specimens from the objects and observe them with the lowest magnification.
Result:
The colored pixels of the newspaper often overlap. Sometimes, you‘ll even notice two colors in one pixel. In the magazine, the dots appear clear and rich in contrast. Look at the different sizes of the pixels.
Objects:
1. threads from various fabrics (e.g. cotton, linen, wool, silk, rayon, nylon, etc.)
2. two needles
What to do:
Each thread is placed on a glass side and frayed with the help of the two needles. Next, wet the threads and cover them with a cover slip. Set the microscope to one of the lower magnifications.
Result:
Cotton fibers come from a plant, and look like a flat, twisted ribbon under the microscope. The fibers are thicker and rounder at the edges than in the middle. Cotton fibers are basically long, collapsed tubes. Linen fibers also come from a plant, and they are round and run in one direction. The fibers shine like silk and exhibit countless bulges on the thread. Silk comes from an animal and is made up of solid fibers that are small in diameter, in contrast to the hollow plant-based fibers. Each fiber is smooth and even and looks like a tiny glass tube. The fibers of the wool also come from an animal. The surface is made of overlapping sleeves that look broken and wavy. If possible, compare wool from different weaving mills. In doing so, take a look at the different appearance of the fibers. Experts can determine which country the wool came from by doing this. Rayon is a synthetic material that is produced by a long chemical process. All the fibers have solid, dark lines on the smooth, shiny surface. After drying, the fibers curl into the same position. Observe the differences and the similarities.
Objects:
1. Table salt
2. Test tube filled halfway with hot water
3. Cotton thread
4. Paper clips
5. Matchstick or pencil
What to do:
Add salt to the water until it no longer dissolves. We now have a saturated salt solution. Wait until the water has cooled. Fix a paper clip to the end of the cotton thread. The paper clip serves as a weight. Tie the other end of the cotton thread into a knot, stick the match through and dip the end with the paper clip in the salt solution. Place the match horizontally on top of the test tube. It prevents the cotton thread from slipping all the way down into the test tube. Now, place the tube in a warm place for 3-4 days.
Result:
If we take a look at the glass after a few days, we can see that a little colony of salt crystals has formed on the cotton thread.
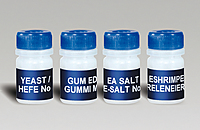
Accessories:
1. Shrimp eggs
2. Sea salt
3. Hatchery
4. Yeast
The Life Cycle of Brine Shrimp
Brine shrimp, or „Artemia salina,“ as they are called by scientists, have an unusual and interesting life cycle. The eggs produced by the female are hatched without ever being fertilized by a male shrimp. The shrimp that hatch from these eggs are all females. In unusual circumstances, e.g. when the marsh dries up, the male shrimp can hatch. These males fertilize the eggs of the females and from this mating, special eggs come about. These eggs, so-called “winter eggs,” have a thick shell, which protects them. The winter eggs are very resistant and capable of survival if the marsh or lake dries out, killing off the entire shrimp population. They can persist for 5-10 years in a “sleep” status. The eggs hatch when the proper environmental conditions are reproduced. These are the type of eggs you have in your microscope set.
The Incubation of the Brine Shrimp
In order to incubate the shrimp, you first need to create a salt solution that corresponds to the living conditions of the shrimp. For this, put a half liter of rain or tap water in a container. Let the water sit for approx. 30 hours. Since the water evaporates over time, it is advisable to fill a second container with water and let it sit for 36 hours. After the water has sat stagnant for this period of time, add half of the included sea salt to the container and stir it until all of the salt is dissolved. Now, put a few eggs in the container and cover it with a dish. Place the glass container in a bright location, but don‘t put it in direct sunlight. Since you have a hatchery, you can also add the salt solution along with a few eggs to each of the four compartments of the tank. The temperature should be around 25º. At this temperature, the shrimps will hatch in about 2-3 days. If the water in the glass evaporates, add some water from the second container.
The Brine Shrimp under the Microscope
The animal that hatches from the egg is known by the name „nauplius larva.“ With the help of a pipette, you can place a few of these larvae on a glass slide and observe them. The larvae will move around in the salt water by using their hair-like appendages. Take a few larvae from the container each day and observe them under the microscope. In case you’ve hatched the larvae in a hatchery, simply take off the cover of the tank and place the tank on the stage. Depending on the room temperature, the larvae will be mature in 6-10 weeks. Soon, you will have had raised a whole generation of brine shrimp, which will constantly grow in numbers.
Feeding your Brine Shrimp
In order to keep the brine shrimp alive, they must be fed from time to time, of course. This must be done carefully, since overfeeding can make the water become foul and poison our shrimp population. The feeding is done with dry yeast in powdered form. A little bit of this yeast every second day is enough. If the water in the compartments of the hatchery or your container turns dark, that is a sign that it is gone bad. Take the shrimp out of the water right away and place them in a fresh salt solution.
Warning! The shrimp eggs and the shrimp are not meant to be eaten!
